Planting tree seedlings
Find out how to plant seedlings to give them the best chance of success.
On this page
Video – how to plant a seedling
This video explains how to plant a seedling for a small to medium scale planting project. It also talks you through how to care for seedlings before planting and at the planting site.
[The words: "Planting seedlings" appear in front of an image of a planting site. White logos for Te Uru Rākau – New Zealand Forest Service and the Ministry of Primary Industries appear under the text.]
[Text on screen: Rory Moores, Senior Advisor – Nurseries]
The narrator of the video, Rory Moores, talks to camera.
Rory: Are you working on a small to medium-sized planting project? If so, this video is for you.
[Footage shows a planting site with seedlings surrounded by plant guards.]
Rory: Let's look at one of the ways to plant a seedling to give it the best chance of success.
[A green screen with white text. The text says, “How do you care for seedlings before planting?”]
[Rory and a colleague arrive at a planting site in a ute. They get seedlings and spades out of the vehicle and walk towards the planting site.]
[A drone shot shows the planting site from above. Lots of trees have been planted and are spaced throughout the site, Rory and his colleague walk across the site.]
Rory: It’s best to plant seedlings in the cooler months from late autumn through to early spring. In cold regions, wait until severe frosts have passed before planting.
[Rory talks to camera.]
Rory: If you're storing seedlings before planting, keep them out of the sun in a sheltered location and away from grazing livestock.
[Various seedlings in trays are shown on screen.]
Rory: Black plastic containers can get hot and dry out seedlings. You need to water seedlings regularly and thoroughly if you're storing them. It’s important to make sure the root ball is moist. We have given our seedlings a soak before bringing them to the site.
[A green screen with white text. The text says, “How do you care for plants at the planting site?”]
[A drone shot shows the planting site from above. Rory and his colleague are on the site.]
Rory: Here we are at the planting site. You can see we prepared the planting site well in advance by removing competing vegetation and spraying invasive weeds and grass.
[A close up shows a fairly big seedling in a plastic container, next to some spades.]
Rory: We're using big individual seedlings stored in plastic containers. But you might also get seedlings in black planter bags or smaller seedlings in root trainers.
Take care when removing the seedling from the container.
You don't want to damage the branches, stem, or roots. You also want to keep as much soil around the roots as possible.
[Rory and colleague start digging a hole on the planting site.]
Rory: If you can see the roots have become tightly wound up inside the base of the container, cut off the tangled roots to help the seedling grow in the soil.
If you’re part of a group, you can remove the seedlings from their containers and lay them out just ahead of the planters.
[Rory talks to camera.]
Rory: But don’t remove the seedlings from containers too early – the roots can dry out in a few hours if left exposed.
[A green screen with white text. The text says, “How do you plant the seedlings?”]
[Rory and colleague walk across the planting site with their seedlings with spades. They start to break up a patch of dead grass and break up the soil beneath with the spade. Then they make a cut in the soil for the seedling.]
Rory: Get your hands on a trusty spade. Consider investing in a proper planting spade like this one if you do a lot of planting.
Use the spade to:
One – clear any competing vegetation from the planting area. You want to give the seedlings plenty of sunlight and space to grow.
Two – cultivate the soil by cutting parallel slots in the ground. With each cut, wriggle the spade backwards and forwards to loosen the ground.
Three – after cultivating the soil make a deep enough cut to fit the root ball, push the spade through to lift the soil and then pull the spade back to create the planting hole.
[Rory talks to camera.]
Rory: Four – if you’re using slow-release fertiliser or water crystals, mix them with the soil in the hole now.
Five – place the root ball in the hole. The top of the potting mix should sit just below the level of the soil surface.
[The seedling is planted in the hole in the soil.]
Rory: If the root ball sits too high, it’ll lose moisture and won’t be stable in the wind.
[Shows a diagram of a seedling and its root ball sitting in a hole with a layer of soil covering the root ball.]
Rory: If it’s too low, the build-up of soil around the seedling might rot the stem. This is about right.
Six – replace the topsoil around the seedling. You can use your hands or boots to push soil down in the gap between the sides of the hole and the root ball.
[Soil is put back around the seedling. Someone wearing boots is pushing down the soil.]
[Rory talks to camera.]
Rory: You don’t want pockets of empty space around the roots.
[The team use their boots to push the soil down and evenly firm up the ground by the seedling.]
Seven – check the seedling’s placement is nice and straight. Use your foot to evenly firm up the ground around the stem.
[Rory talks to camera.]
Rory: You want the soil to be firm, but not concrete.
You won’t need to water your seedlings after planting if the root ball was already moist.
[Shows a green screen with white text. The text says, “How do you care for seedlings after planting?”]
[Rory talks to camera.]
Rory: There are extra steps you can take to help your seedlings. These depend on the size of your planting project and how much you’re willing to spend.
[Footage of the planting site shows a tree seedling with a cardboard plant guard surrounding it.]
Rory: You can place a stake next to each seedling. This makes it easier to find the seedlings in a few months when you need to weed around them.
You don’t need to tie your seedlings to the stake.
[The team add a matt around the stems of the seedling.]
Rory: Add mulch or matting around the stems of the seedlings to keep the soil moist and the weeds down. You can use compostable material like fine bark chips or wool mats.
[The team put a cardboard plant guard over the seedling and secure it with stakes.]
Rory: Add plant guards around the seedlings. This shelters the seedlings and reduces browsing from rabbits and hares. There’s a range of plant guards available, including reuseable plastic and biodegradable options.
[The team leave the planting site, carrying their spades and planting containers.]
Rory: So that’s how you plant seedlings. We’ll keep a close eye on our seedlings as they grow to make sure they’re not smothered by weeds or nibbled by pests.
[Footage shows the newly planted tree seedling on the site, surrounded by its plant guard and with a weed mat on the base.]
Rory: We’ll also make sure to fence off livestock from the area.
[A green screen with white text says: Email: forestserviceadvice@mpi.govt.nz or website: mpi.govt.nz/forestry.]
[Logos for the Ministry of Primary Industries and Te Uru Rākau – New Zealand Forest Service appear in front of a green background. Text on the screen says: Te Uru Rākau – New Zealand Forest Service is part of the Ministry for Primary Industries.]
Before you plant
You need to prepare the planting site. You may need to clear pest plants, especially vine weeds like Himalayan honeysuckle and groundcover weeds like tradescantia. Consider which existing plants might be worth keeping, as some can provide shelter and help your seedlings establish.
As well as clearing weeds, consider fencing off the planting site to prevent browsers from nibbling your seedlings.
Land preparation for planting trees
You need to choose the right trees for your site. Consider factors like temperature, rainfall, wind exposure, and shade.
When to plant seedlings
In warmer districts, you can plant seedlings in the cooler months from late autumn through to early spring. It might be best to plant in late autumn. That way, the seedlings have an entire winter to establish before the warm, dry summer.
In cold regions, planting seedlings in late autumn is risky as they might not survive the harsh winter. Instead, wait until the last of the spring frosts pass before planting.
Storing and transporting seedlings
Storing seedlings
If you’re storing seedlings before planting, keep them out of the sun in a sheltered location. You need to water seedlings regularly and thoroughly if you’re storing them.
If you need to delay planting for an extended period, there are some things you can do to help your seedlings survive.
Transporting seedlings to the planting site
Before taking seedlings to the planting site, give them a thorough soaking with water. The root ball needs to be moist when you plant the seedling.
Take care transporting the seedlings. If possible, keep them out of the wind – for example, in a covered trailer. Avoid packing the seedlings too tightly to prevent damage to branches and stems.
At the planting site, store seedlings out of direct sunshine.
Planting seedlings from containers
Removing the container
Take care removing the seedling from the container or planter bag. You want to keep as much soil as possible around the roots.
If the roots have become tightly wound-up inside the container (called “root-bound”), trim away the tangled roots. Root-bound plants grow slowly and may be unstable when they mature.
Digging the hole
Get yourself a good-quality spade. A planting spade that’s designed for the job will make the task easier. Use the spade to:
- clear any weeds or grass from the planting area
- cut parallel slots in the ground to loosen the soil
- dig a hole that’s wide and deep enough to comfortably fit the root ball
- cultivate (break up) the soil on all sides of the hole so the root ball is surrounded by loose soil.
If you’re using slow-release fertiliser or water crystals, mix them with the soil in the hole now. Keep in mind that nursery-grown plants already contain slow-release fertiliser in their potting mix.
Positioning the plant
- Place the root ball in the hole. The root ball should sit about 5 cm below the soil surface. If the root ball sits too high, it’ll lose moisture. If it sits too low, the build-up of soil around the seedling might rot the stem.
- Replace the soil around the seedling. You can use your hands or boots to press the soil into the gap between the root ball and the sides of the hole. You want to eliminate empty pockets in the hole, so the roots are surrounded by soil.
- Check the seedling is standing nice and straight. Use your foot to firm up the soil around the stem, ensuring the seedling is stable. The goal is to create a secure base without compacting the soil too tightly.
You won’t need to water your seedlings after planting if the root ball was already moist.
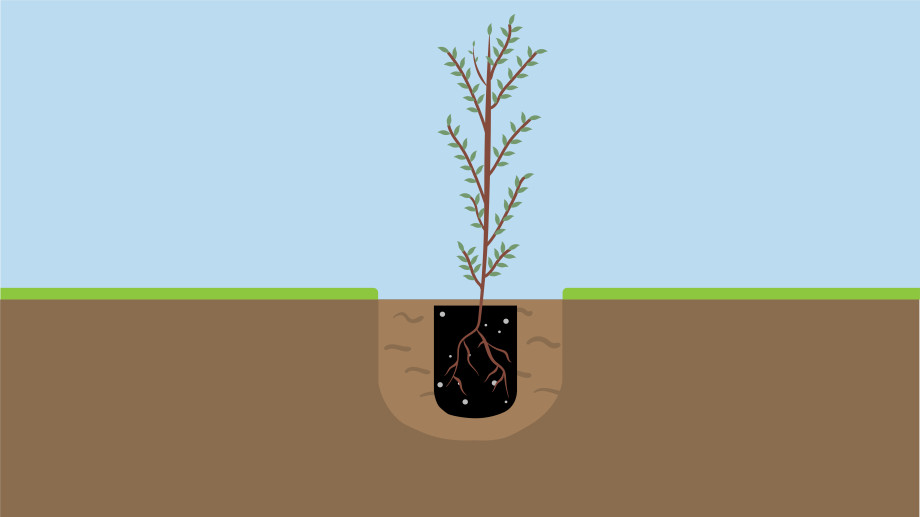
Image description
This image shows a cross-sectional view of a kānuka seedling planted at the correct depth. The seedling’s roots extend down into a black ball of potting mix. The roots and potting mix sit in a hole surrounded by loose, cultivated light-brown soil. A layer of topsoil covers the potting mix. Beyond the cultivated area, the surrounding soil is dark-brown and compact. It’s covered by a layer of grass.
Planting small and bare-root seedlings
You can buy small “forestry-grade” seedlings with plugs of soil around the roots, or as bare-root seedlings without any soil attached. Smaller seedlings are usually cheaper, but they need extra care. For example, you must thoroughly clear the planting site of competing vegetation. If you’re using bare-root seedlings, keep them cool and moist, and plant them within a few days of delivery.
Many of the same principles for planting seedlings from containers also apply here. You need to ensure the soil and root mass are moist and plant the seedlings at the correct depth in cultivated ground. When planting smaller grade seedlings, use a spade to:
- cut parallel slots in the ground to loosen the soil
- displace a wedge of soil to create a narrow hole that’s wide and deep enough for the roots (this is quicker than digging out soil).
Place the seedling roots into the hole at the correct depth. For bare-root seedlings, apply a gentle upward pull on the stem while positioning the seedling. This helps to avoid root distortion. Finally, use your boot to firm up the soil around the seedling’s roots.
Positive pull up planting – bare rooted tree stock
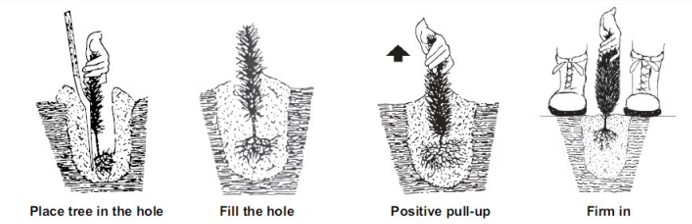
Image description
This image is a 4-step diagram that shows how to plant a bare-root seedling:
- Place a tree in the hole – a person positions a pine seedling in a narrow hole. The drawing shows their hand, the spade used to make the hole, and cultivated soil surrounded by dense, uncultivated soil.
- Fill the hole – the seedling sits in the hole, partially buried by the cultivated soil.
- Positive pull-up – a person gently pulls the seedling upwards to straighten the roots. The drawing shows a hand grasping the top of the seedling and pulling upwards, and the seedling lifting slightly from the soil.
- Firm in – a person holds the tip of the seedling and uses their boots to firm up the cultivated soil. The drawing shows the seedling well-positioned, with its roots evenly spread and surrounded by cultivated soil.
Improving seedling survival
There are extra steps you can take to help your seedlings. These depend on the size of your planting project and how much you’re willing to spend. You can:
- add mats or mulch around seedling stems to suppress weeds and keep moisture in the soil
- place plant guards around seedlings to shelter them from wind and reduce browsing by rabbits
- put a stake beside your plants to make them easier to find when you weed them in the coming months.
Getting your seedlings in the ground is only half the job. In the coming months, you need to:
- weed around the seedlings regularly (called “releasing”)
- keep on top of pests like rabbits and possums
- prevent livestock from getting into the planting area.